How to Set Up Analytics in Flutter Using Firebase
Summary
This article aims to help you learn how to set up Firebase Analytics in Flutter, an essential step for tracking user interactions and app performance, ensuring optimal data-driven decisions for enhancing user experience and achieving business goals.
Key insights:
Essential Setup Steps: Creating a Firebase project and initializing Firebase within a Flutter app are foundational steps for integrating Firebase Analytics.
Importance of Proper Initialization: Correct Firebase initialization ensures accurate data collection for analytics-driven decisions.
Segmented Firebase Projects: Separate Firebase projects for different app flavors prevent data mix-up, maintaining clean and relevant analytics.
Debugging with Firebase DebugView: Utilizing Firebase DebugView allows real-time event monitoring for debugging and verifying analytics setup.
Optimization and Regular Review: Continuously optimizing and reviewing your Firebase Analytics setup helps maintain its effectiveness and relevance to app objectives.
Introduction
Understanding how users interact with your application is essential for improving user experience and achieving business goals. Firebase Analytics offers a powerful and comprehensive solution to track user behavior, app performance, and the effectiveness of your features and marketing efforts.
This article will take you through the process of setting up and testing Firebase Analytics in a Flutter application, following best industry practices to ensure accurate data collection.
Analytics
1. Definition
In the context of mobile applications, analytics typically refers to the collection and analysis of data related to user interactions, app performance, and other key metrics. This data can be used to make informed decisions about app development, marketing strategies, and user engagement initiatives.
2. Why is Analytics Important?
Integrating analytics into your mobile application provides several benefits:
User Behavior Understanding: By tracking user interactions, you can understand how users navigate your application, which features are most popular, and where users drop off. This information is vital for improving the user experience.
Performance Monitoring: Analytics allows you to monitor the performance of your app, including load times, crashes, and other technical issues. This helps in maintaining a high-quality user experience.
Data-Driven Decisions: With analytics, decisions can be made based on data rather than assumptions. This leads to more effective marketing strategies, feature development, and resource allocation.
Targeted Marketing: Analytics enables you to segment users based on their behavior, allowing for more targeted and effective marketing campaigns.
Measuring Success: Analytics provides metrics to measure the success of your app, features, and marketing efforts. You can set specific goals and track your progress toward achieving them.
Setting Up Firebase Analytics in a Flutter Application
In this section, we will dive into the step-by-step process of setting up Firebase Analytics in a Flutter application while following best industry practices.
1. Create a Firebase Project
The first step is to create a Firebase project, if you do not already have one. Firebase is a platform developed by Google that provides backend-as-a-service. It provides a variety of services including analytics, authentication, and real-time databases.
1. Navigate to the Firebase Console and sign in with your Google account.
2. Click on “Create a Project” and follow the on-screen instructions to create a new project. Make sure to enable Google Analytics if prompted.
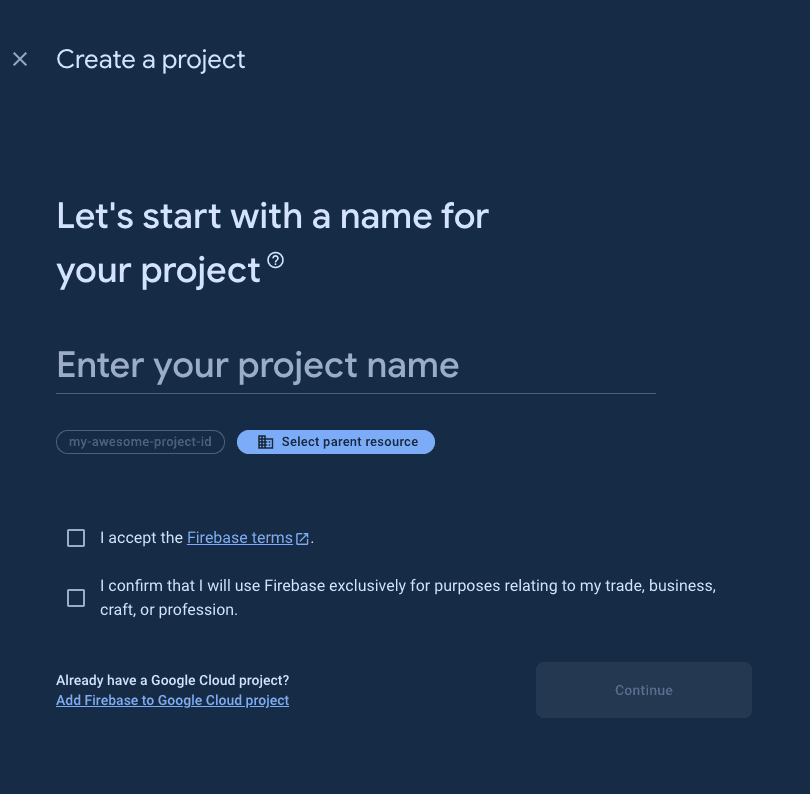
Once the project has been created, you will be redirected to the dashboard. In the next steps, we will move to our Flutter application and make the necessary initializations.
2. Install FlutterFire CLI
FlutterFire is a set of Flutter plugins that enable Flutter apps to use Firebase services. To streamline the process of integrating Firebase with your Flutter app, you can use the FlutterFire CLI. This can be done by running the following command in your terminal: dart pub global activate flutterfire_cli
3. Initialize Firebase in Your Application
With your Firebase project set up and the FlutterFire CLI installed, the next step is to initialize Firebase in your Flutter application.
1. Open your Flutter project and add Firebase analytics to your project dependencies by running the following command in your terminal: flutter pub add firebase_core firebase_analytics.
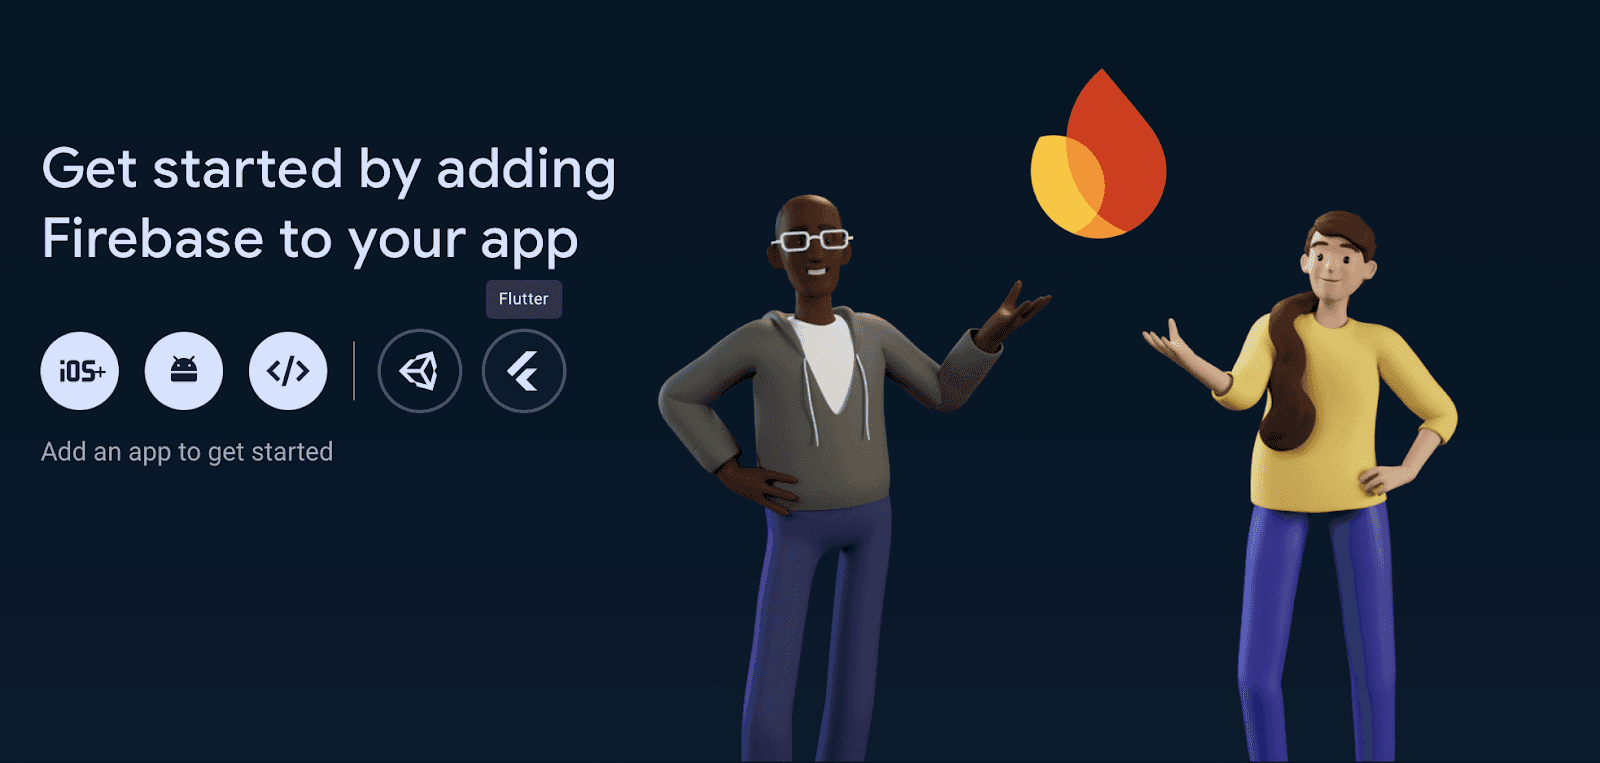
2. Connect your Flutter application to Firebase. These steps can be found on the project dashboard by clicking on the Flutter icon shown below:
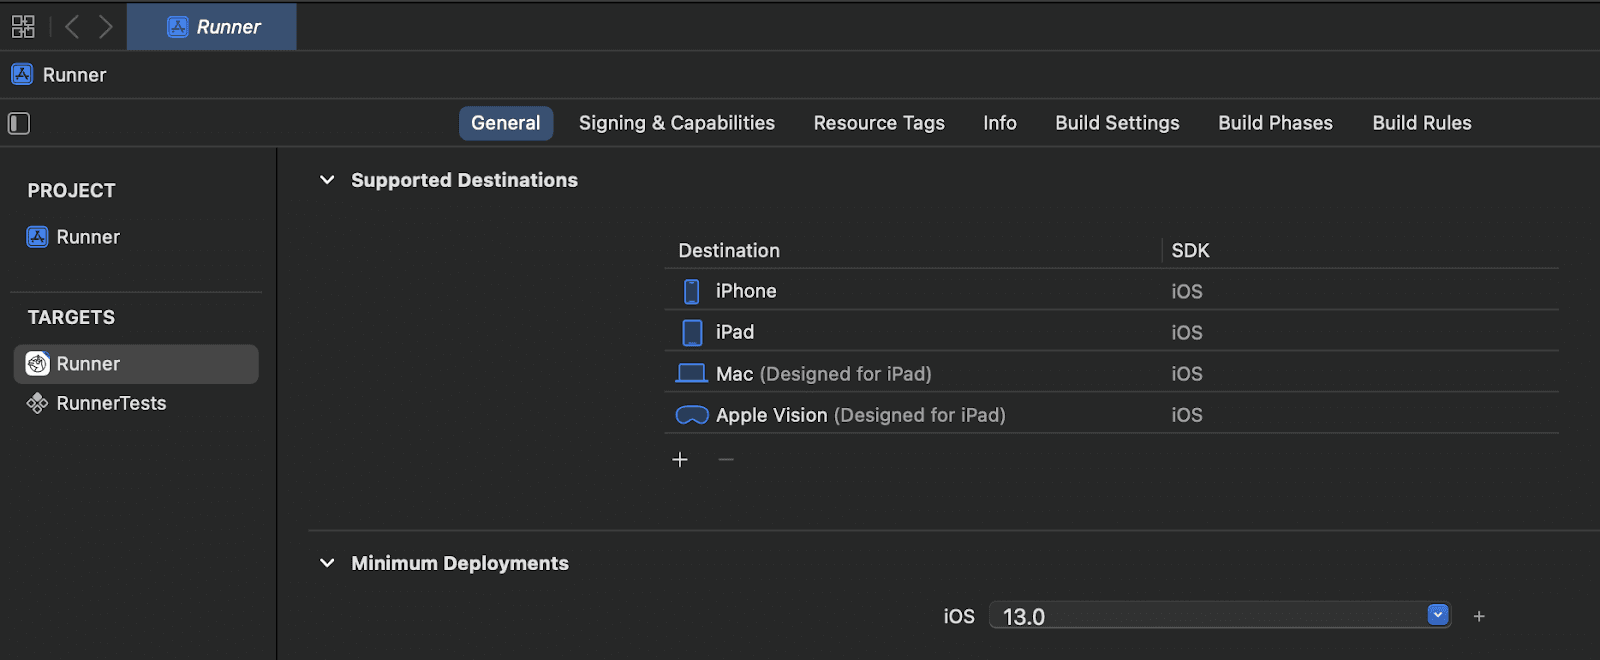
3. At the moment, Firebase requires a minimum iOS deployment version of 13.0 By default, this is set to 12.0 when you create a Flutter project. Therefore, we need to change the minimum version by opening the ios directory of your Flutter project in Xcode. Then, click on Runner under TARGETS and locate the Minimum Deployments section under the general tab. Here, set the version to 13.0:
4. Initialize Firebase in your application at the entry point of your project. The code should look something like this:
This code initializes Firebase using the options generated by the FlutterFire CLI.
4. Create an Analytics Service
To manage analytics events more efficiently, we recommend encapsulating Firebase Analytics in a service class. This class will handle the logging of events and other analytics-related tasks. Create a new Dart file called analytics_service.dart or run stacked create service analytics if you are using Stacked as your state management solution.
Define the Analytics Service class as follows:
In the code above, we define a few methods to log some events for showcasing the functionality. However, you may have different events based on your application. Firebase has a list of recommended events that should be logged based on your industry that can be found here.
Additionally, Firebase Analytics automatically logs certain information like the user’s geographical data or when they view a new screen without the need for additional code. For the complete list of automatically collected events, check out this page.
5. Log Events
To log an event, you can use the AnalyticsService class in your application. For example:
Similarly, you can use any method that you define in your AnalyticsService class to log events where appropriate within your application.
However, it is also important to note that you should avoid over-logging. Too many events can clutter your analytics and make it harder to extract actionable insights. Furthermore, only log the events that provide meaningful insights into user behavior.
Debugging Analytics
Debugging your analytics setup is essential to ensure that your project has been set up properly and that events are being logged correctly. Firebase provides tools to help you verify your analytics setup. This section of the article will help you debug your application.
1. Setup for Android
To enable debugging on Android devices, run the following command in your terminal:
adb shell setprop debug.firebase.analytics.app [your_app_package_name]
The above command works when you are working with a single flavor. However, if you have set up flavors, you should run the following command:
adb shell setprop debug.firebase.analytics.app [your_application_id]
To disable debugging, run the following command:
adb shell setprop debug.firebase.analytics.app .none.
2. Setup for iOS
To enable debugging for iOS, begin by opening the ios directory in Xcode. Then, navigate to Product->Scheme->Edit Scheme. If you are working with multiple flavors, you can select the flavor scheme that you want to enable debugging on. There, add -FIRDebugEnabled and -FIRAnalyticsDebugEnabled flags under “Arguments Passed On Launch” as shown below:
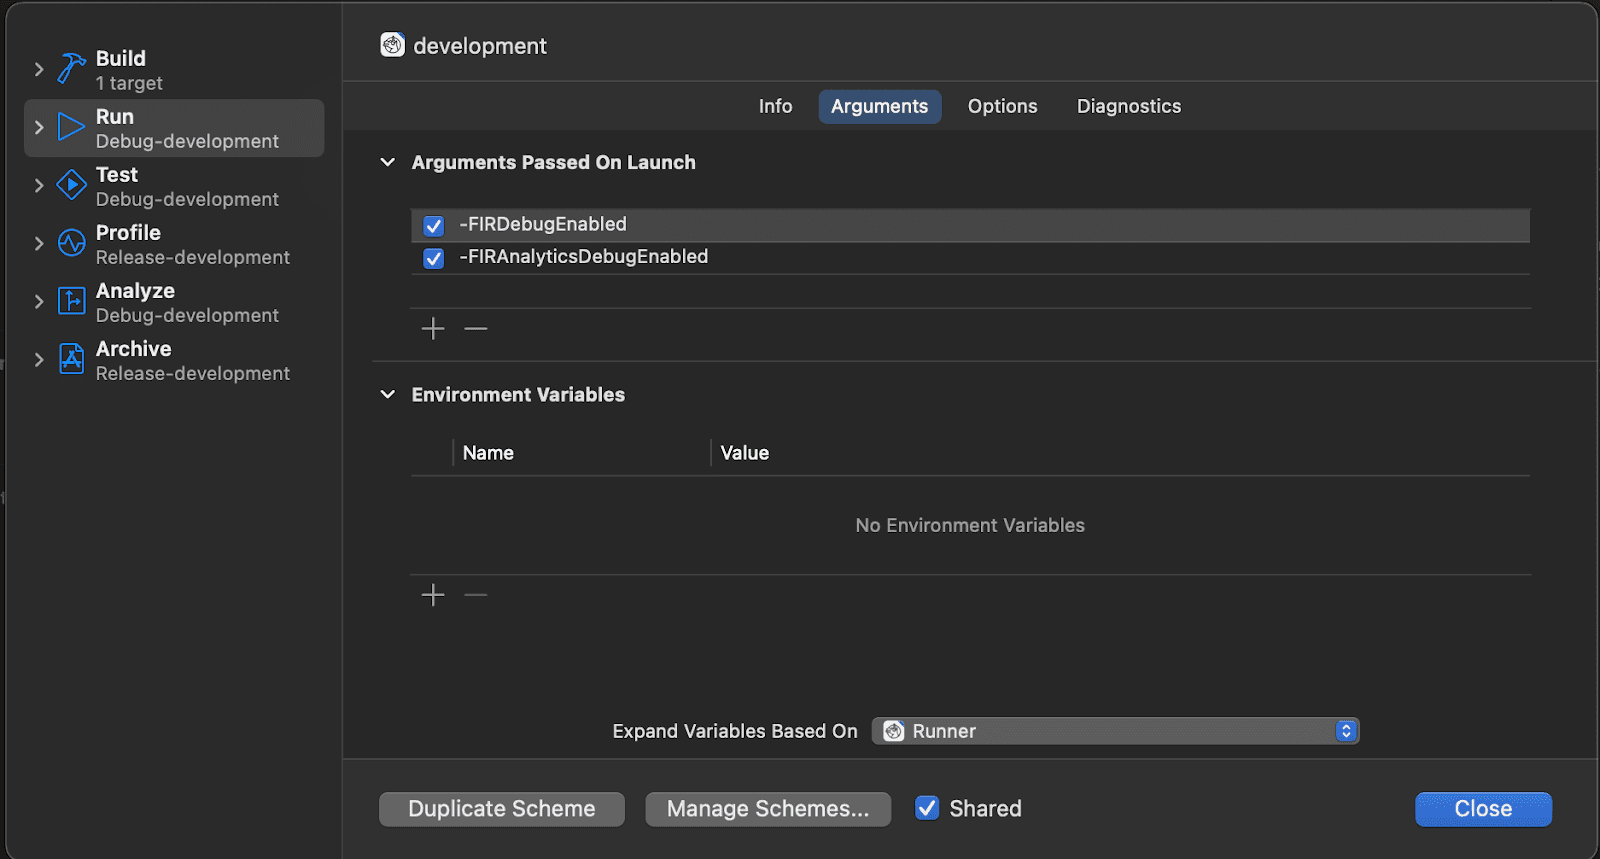
Note that this flag will only work if you run your application directly from Xcode. Running the app using flutter run or through an IDE will not trigger the arguments to be executed on launch.
To disable debugging, you can run the following arguments on launch: -FIRDebugDisabled and -FIRAnalyticsDebugDisabled.
3. Check DebugView
You can now view the logged events in real time using Firebase’s DebugView which can be found under the Analytics section on the project dashboard.
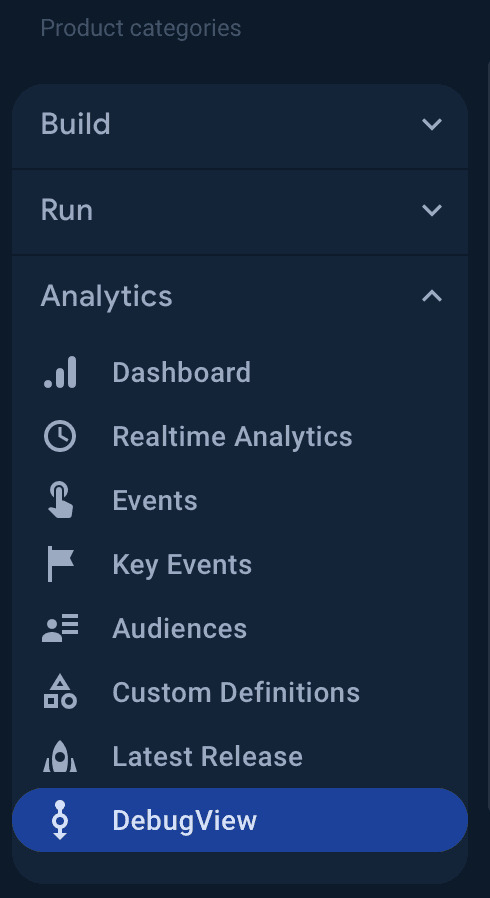
If you have followed the steps correctly, you should be able to see live events being logged from your debug device.
Important Things to Remember
When setting up Firebase Analytics in your Flutter application, there are several important considerations to keep in mind to ensure a smooth and effective implementation:
1. Initialize Firebase Correctly
When setting up Firebase Analytics, it is important to ensure that Firebase is initialized correctly at the entry point of your application. This is the first step in guaranteeing that your analytics data is captured. If your Flutter project uses multiple flavors, make sure to initialize Firebase within the correct flavor context. This helps avoid data inconsistencies that can arise from incorrect initialization.
2. Create Separate Firebase Projects for Each Flavor
To maintain clear and accurate analytics data, you should create separate Firebase projects for each flavor your application might have. We recommend setting up flavors by following this guide.
By setting up individual Firebase projects, you ensure that data from development interactions by QA or internal teams does not get mixed with real user data from the production environment. This approach helps maintain the integrity of your analytics data and provides more reliable insights into user behavior.
Each environment should use its own Firebase configuration file. For Android, this means having a specific google-services.json file for each environment. For iOS, use separate GoogleService-Info.plist files. To read more about setting these files up, check out the official Firebase docs or this detailed guide.
Once you have these set up, make sure to analyze data separately for each environment to avoid misinterpretation that could occur if data from different environments were combined.
3. Include Both Flags in iOS Launch Arguments
For iOS, always include the -FIRDebugEnabled and -FIRAnalyticsDebugEnabled flags in the launch arguments when testing your analytics implementation. Although the official Firebase documentation guides users to only include -FIRDebugEnabled, we have had some trouble with events not being logged unless both arguments are present.
4. Run iOS Applications via Xcode for Testing
To properly test analytics on iOS, you should run your application directly from Xcode. This practice ensures that any launch arguments or special configurations are correctly applied, giving you accurate insights into how your analytics are performing. Skipping this step will result in your device not entering analytics debugging mode.
5. Be Patient with Log Updates
In Firebase Analytics, most events triggered by users on your app are grouped together and sent in batches. This batching process helps optimize performance and reduces the impact on network bandwidth. Therefore, it can take up to an hour for events to appear on the Firebase Dashboard.
Additionally, if a user’s device goes offline while they are interacting with your app, Firebase Analytics stores the event data locally on their device. Once the device regains internet access, the data is automatically sent to Firebase. Events that are more than 72 hours old at this stage are ignored.
6. Avoid Over-Logging
While it may be tempting to log every possible event, it is important to avoid over-logging. Excessive logging can clutter your analytics data, making it difficult to extract meaningful insights. Focus on logging events that provide actionable insights and are aligned with your application’s goals. This approach will help keep your analytics data clear and relevant.
7. Check for Required Permissions
Ensure that your application has all the necessary permissions set up correctly for both Android and iOS. For applications that are looking for compliance with industry regulations, it is important to ensure that you directly ask the user for the required permissions to avoid any issues.
8. Use Firebase DebugView for Real-Time Monitoring
Firebase DebugView is an invaluable tool for monitoring events in real-time during development. Utilizing DebugView allows you to verify that your events are being logged as expected before pushing your app to production. This real-time monitoring can save you from potential issues and ensure that your analytics setup is functioning correctly.
9. Regularly Review and Optimize
It is important to regularly review your analytics setup to ensure it continues to meet your application’s evolving needs. This includes optimizing event logging, refining user segmentation, and making adjustments based on new insights. Ongoing monitoring and optimization are key to maintaining an effective analytics strategy.
Conclusion
In conclusion, setting up proper analytics in your Flutter application is essential to understanding your users and making data-driven decisions. However, ongoing monitoring and optimization of your analytics are vital to ensure data accuracy and relevance. By continuously refining your setup and adapting to new trends, you can maintain a robust analytics framework that remains aligned with best industry practices and effectively supports your app’s growth and success.
Authors
Enhance Your Product Insights with Comprehensive Analytics
Unlock the full potential of your product with Walturn. We integrate powerful tools like Firebase, Mixpanel, Sentry, and more to provide you with a clear, actionable view of user behavior and interactions. Gain deeper insights into your user journey, optimize engagement, and drive growth with data-driven decisions.
References
“Firebase Analytics Debug View Does Not Show Anything.” Stack Overflow, 2024, stackoverflow.com/questions/42769236/firebase-analytics-debug-view-does-not-show-anything.
Google. “[GA4] about Events - Analytics Help.” Google.com, 2019, support.google.com/analytics/answer/9322688?hl=en&ref_topic=13367566&sjid=4164486252811674724-AP.
---. “[GA4] Automatically Collected Events - Analytics Help.” Google.com, 2019, support.google.com/analytics/answer/9234069?authuser=0.
---. “[GA4] Recommended Events - Analytics Help.” Google.com, 2019, support.google.com/analytics/answer/9267735?authuser=0.
---. “Configure Multiple Projects.” Firebase, 2024, firebase.google.com/docs/projects/multiprojects.
---. “Google Analytics.” Firebase, firebase.google.com/docs/analytics.
Yusuf Fachroni. “Flutter IOS — Setup Flavors with Different Firebase Config.” Medium, Medium, 3 June 2023, ahmedyusuf.medium.com/setup-flavors-in-ios-flutter-with-different-firebase-config-43c4c4823e6b.


